Single Ventricle Circulation Home
An educational simulation of circulation in children and young adults throughout the staged surgical palliation of congenital single-ventricle heart defects, culminating in the Fontan procedure.
(Please bear with me. I want to go ahead and make this material available for now, and I will improve the format soon.)
Overview:
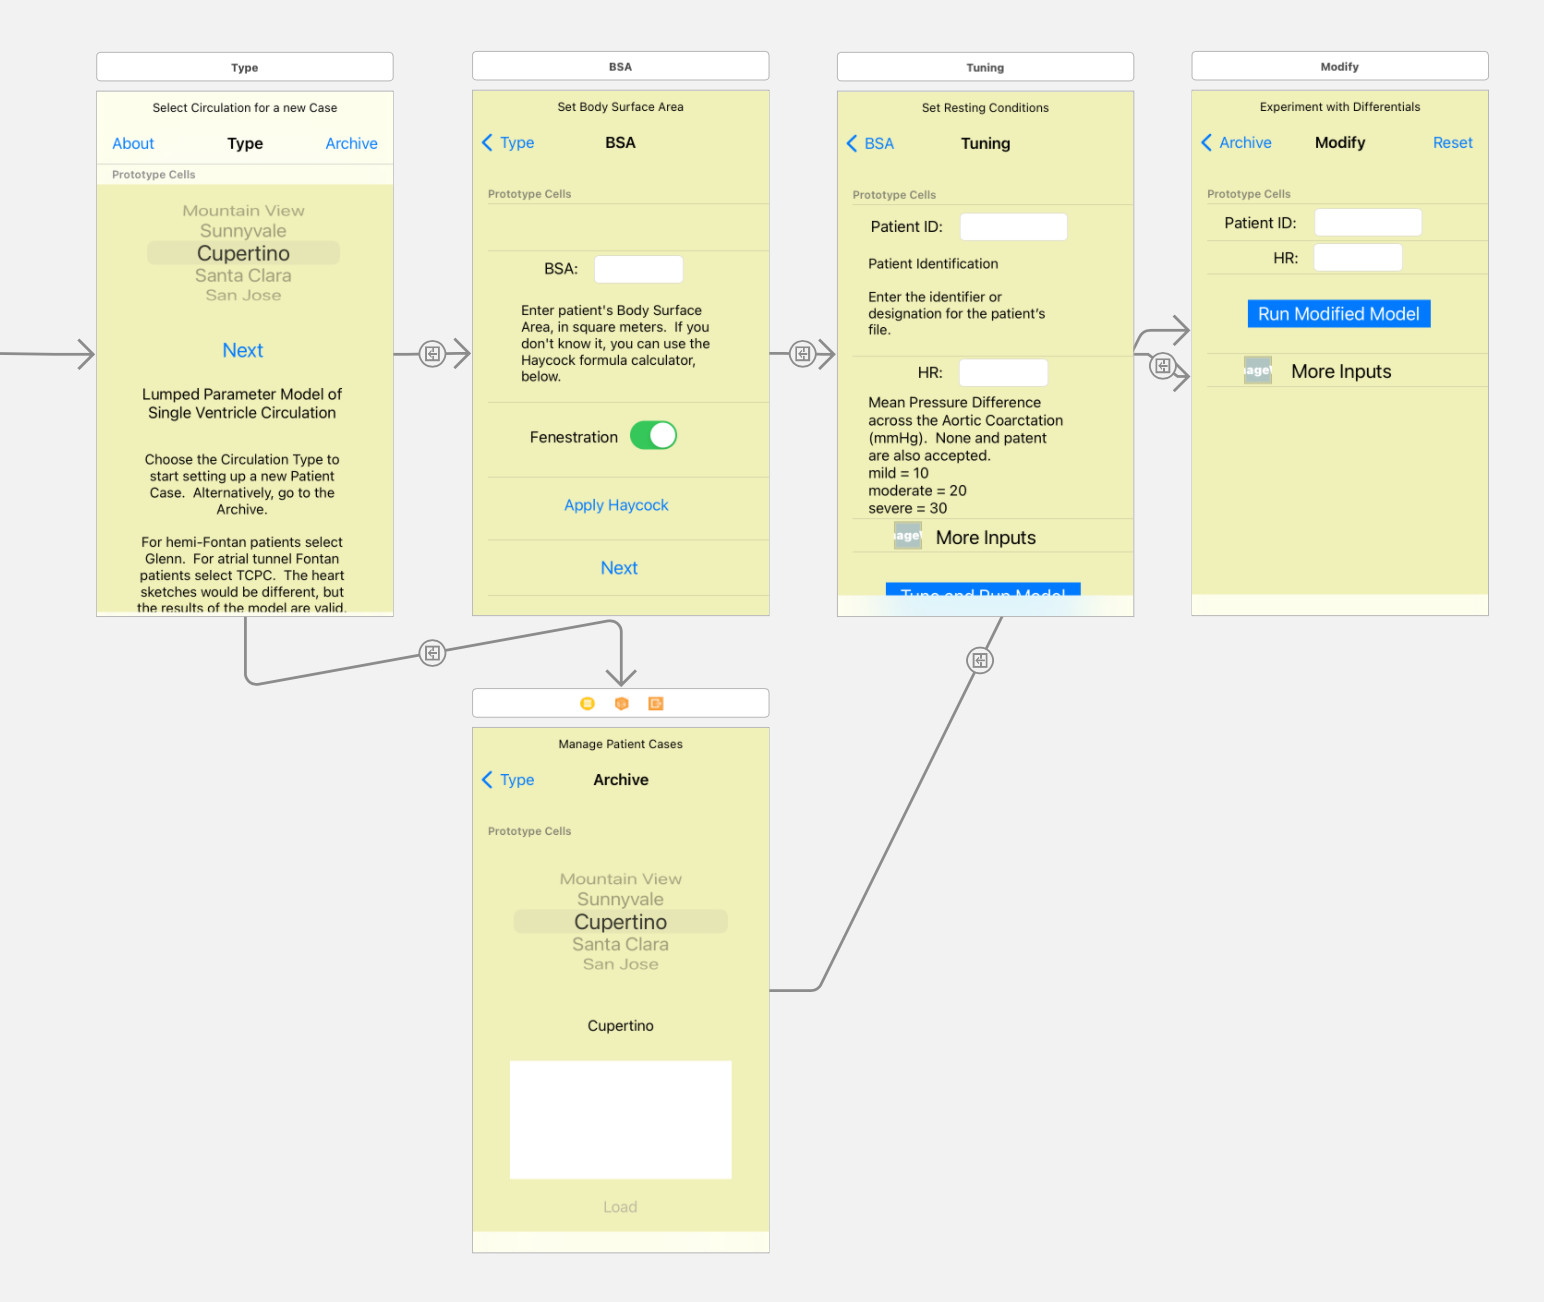
The Single Ventricle Circulation app is of split-view design. The narrow, master view on the left holds a sequence of screens with various control inputs for the simulation. The main view holds a large sketch of the heart, and after running a simulation the results are displayed over it. In the iPhone version of the app the control screens are displayed first, and then results of simulations are displayed after each run. The basic organization of simulations is the “Patient Case,” which is a file representing one person with single-ventricle circulation. The user enters parameters representing the patient’s normal, resting-state physiology, and the resulting simulation is the “Baseline Run.” Parameter entry is divided into three steps (Type, BSA, and Tuning Control Screens) so that the app can provide reasonable default values at each step. In a final, fourth step (the Modify Control Screen) the user can vary many of the inputs for additional, Modified Runs, for comparison to the baseline. The entire Patient Case can be saved in an archival database, and there is a facility to maintain and retrieve the Cases from the database.
Type Control Screen:
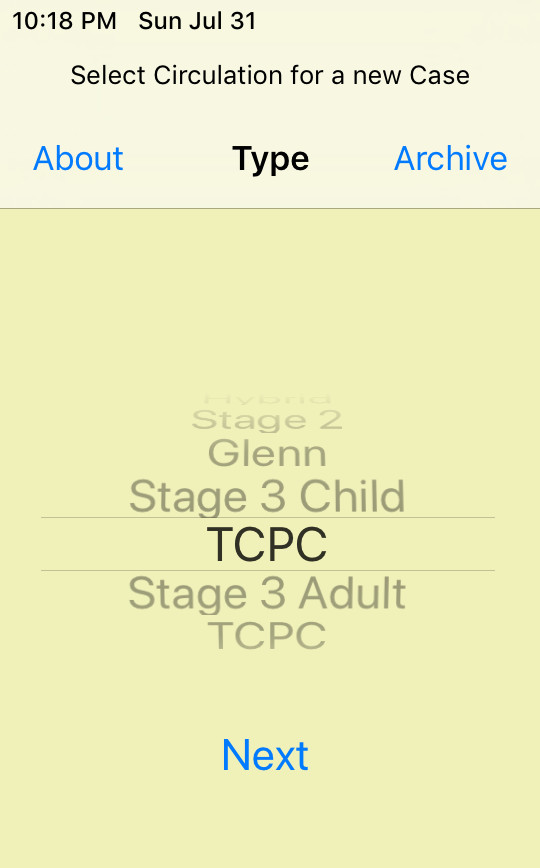
Upon launching the app, the first view is the Type control screen. This is where the user begins building up the description of a single-ventricle circulation patient (the Patient Case) by selecting the surgical type of circulation using the picker wheel. The heart sketch in the main view is updated to reflect the selection. In Stage 1 (infant size) there are three distinct shunt options: mB-T, Sano, and Hybrid. In Stage 2 (toddler size) only one option is given, which is Glenn (bidirectional Glenn). The simulation does not include any distinction for hemi-Fontan, so if your patient had a hemi-Fontan surgery, select Glenn. Similarly, in Stage 3 child-size and Stage 3 adult-size there is only one option given, which is TCPC (extracardiac-conduit Total Cavopulmonary Connection). The simulation does not include a distinction for the lateral tunnel surgery, so select TCPC. Tap the Next button to proceed to the BSA control screen. The Type control screen has two other buttons in the navigation bar. The “About” button on the left launches the web browser to display this web site. The Archive button on the right navigates to the Archive control screen, where the user can retrieve previous Patient Cases stored in the app database, including three example cases that ship with the app.
BSA Control Screen:
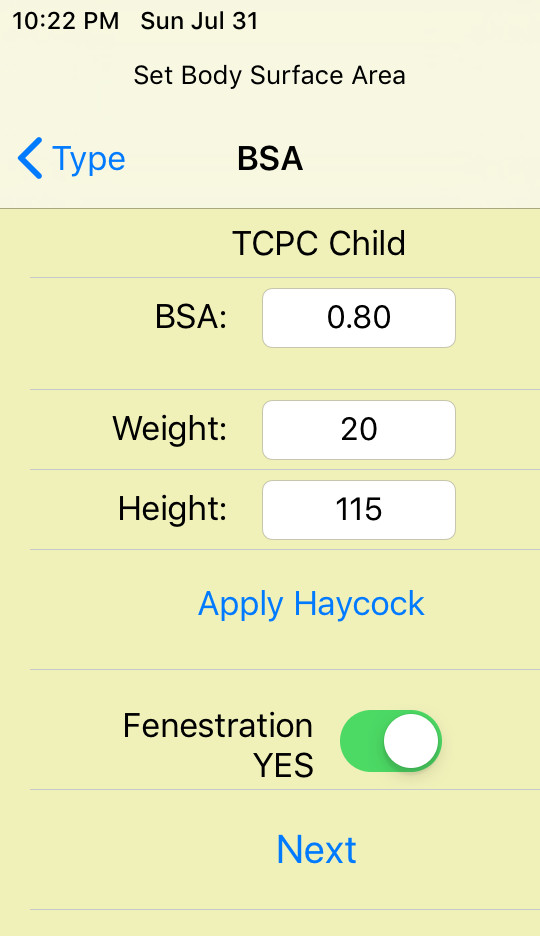
The mathematical simulation of circulation is scaled in terms of the patient’s BSA (Body Surface Area, in square meters). A default value is provided according to the four size classes. The stage 1 size is typical for a baby approaching Stage 2 conversion (not a neonate). Likewise the Stage 2 size is typical for a child approaching Stage 3 conversion. If the patient’s BSA is known, use the virtual keyboard to replace the default in the input field. People rarely know their BSA, so a calculator is provided. Enter the patient’s weight (kg) and height (cm) in the numeric fields provided, then tap the “Apply Haycock” button to calculate BSA using the Haycock formula.
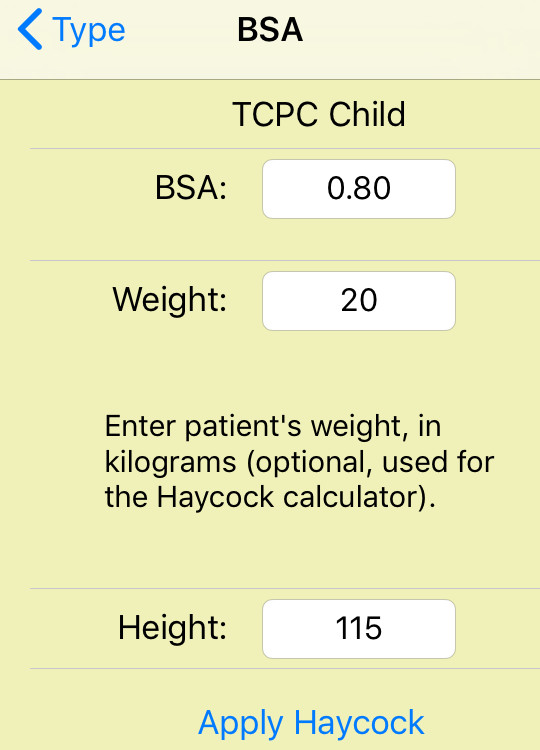
There is a “Help” feature: for each control input, tap the label next to the input field to expand the row, revealing a little explanatory text and some hints for the range of values.
Finally, for Stage 3 circulations there is the option of fenestration. Turn it on or off, according to the patient.
Tap the Next button to proceed to the Tuning control screen.
Turning Control Screen:

In the Tuning control screen the user enters all the control inputs of the simulation for the patient’s baseline, resting state, with default values having been provided according to the circulation type, BSA and fenestration status. Many of these values can only be measured by the most invasive catheterization studies, so don’t feel bad about depending upon default values.
Some inputs are disabled when they are not appropriate for the given circulation type.
Patient ID: Enter the identifier or designation for the patient’s file (the Patient Case). This will identify the case in the archive.
HR: Heart Rate (beats/minute) enter the resting value.
MAP: Mean Arterial Pressure (mmHg). This can be estimated as MAP = (systolic + 2*diastolic)/3.
SAP: Mean Single Atrium Pressure (mmHg). Generally unknown without catheterization. The MAP and SAP values entered here are targets for a tuning process in the simulation, analogous to setting the set-point of a thermostat or the speed control of a car. The actual results of the simulation will be a little different. The user is free to adjust the inputs and re-run the simulation until results are satisfactory.
SVRI: Indexed Systemic Vascular Resistance (mmHg/(l/min)*m^2, also known as Woods Units*m^2).
PVRI: Indexed Pulmonary Vascular Resistance (mmHg/(l/min)*m^2, also known as Woods Units*m^2). These are the values for the vascular beds, excluding coarctation or pulmonary artery stenosis. SVC and IVC stenosis are not supported.
Shunt Dia: Stage 1 shunt internal diameter (millimeters). For mB-T shunt, Sano shunt, or the stented Patent Ductus Arteriosis of the Hybrid Stage 1 surgery.
Fenes Dia: Stage 3 Fenestration diameter (millimeters). “None” and “closed” are also accepted inputs. Shunt diameter and fenestration diameter are used to estimate the flow resistance of these respective flow regulating devices. If the actual flow is known from echo doppler for instance, the diameter input can be adjusted and the simulation re-run until the simulation result matches the known value.
O2 Cons: Indexed Oxygen Consumption, at resting level (ml O2/min/m^2).
Hb: blood Hemoglobin concentration (g/dl).
More Inputs:
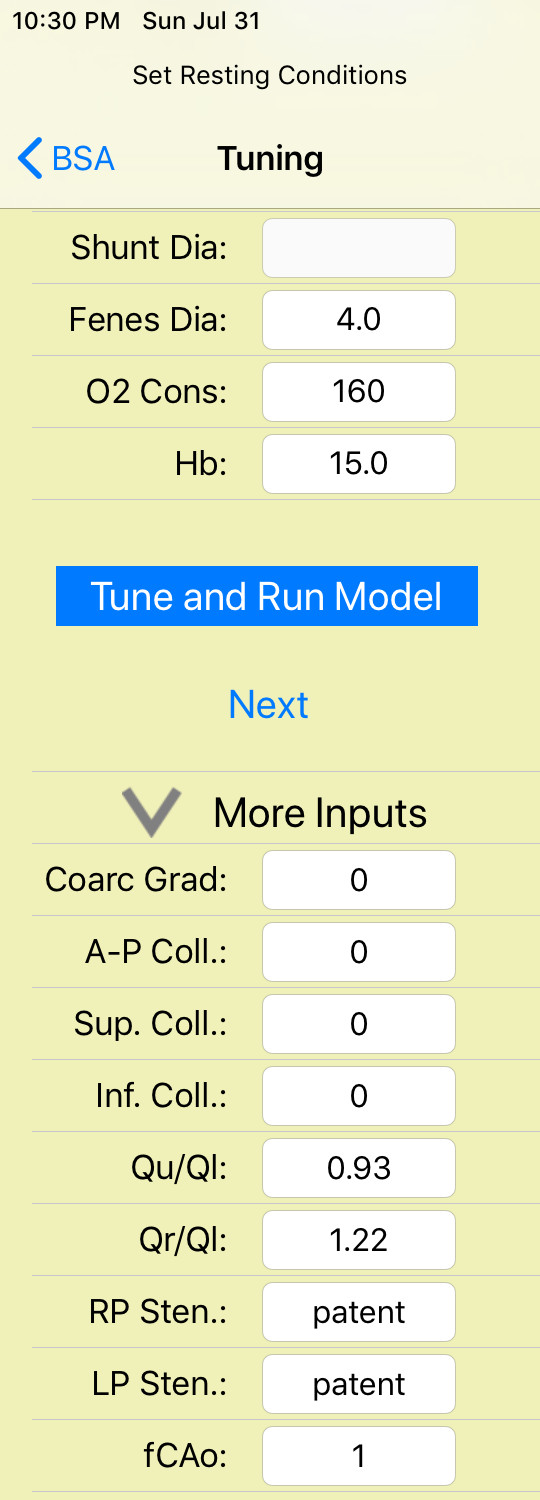
Tap the disclosure arrow to reveal nine more tuning control inputs.
Coarc Grad: Mean pressure gradient across the Aortic coarctation (mmHg). “None” and “patent” are also accepted inputs. Mild = 10, moderate = 20, and severe = 30.
A-P Coll: Systemic arterial to pulmonary arterial collateral flow, scaled as a percentage of total pulmonary flow. Small = 10%, moderate = 30%, and large = 50%.
Sup. Coll: Superior vena cava to pulmonary vein collateral flow, scaled as a percentage of total pulmonary flow. Small = 10%, moderate = 20%, and large = 30%.
Inf. Coll: Inferior vena cava to pulmonary vein collateral flow, scaled as a percentage of total pulmonary flow. Small = 10%, moderate = 20%, and large = 30%.
The above four inputs set local resistance elements in the simulation. They are given estimated values based on the given inputs. Simulation results will be slightly different. If greater precision is required, the user is free to make adjustments to the inputs and re-run the simulation until it is satisfactory.
Qu/Ql: Ratio of upper body flow over lower body flow (unitless). This is used to distribute the systemic vascular bed resistance. This value decreases with growth, as the patient’s lower body catches up with the head. Within the simulation, this is the inverse resistance ratio, lower body vascular resistance over upper body vascular resistance. If the patient has coarctation, it is the ratio of flows that would result in the absence of coarctation.
Qr/Ql: Ratio of right lung flow over left lung flow (unitless). This is used to distribute the pulmonary vascular bed resistance. Within the simulation, this is the inverse resistance ratio, left lung vascular resistance over right lung vascular resistance. If the patient has pulmonary artery stenosis, it is the ratio of flows that would result in the absence of stenosis.
RP Sten: Right pulmonary artery stenosis internal diameter (mm), or lumen diameter set by banding in the case of Hybrid Stage 1 circulation. “None” and “patent” are also accepted inputs.
LP Sten: Left pulmonary artery stenosis internal diameter (mm), or lumen diameter set by banding in the case of Hybrid Stage 1 circulation. “None” and “patent” are also accepted inputs.
fCAo: Aortic arch compliance factor (unitless). Normal = 1.00. Reduced compliance increases pulse pressure and ventricular work.
“Tune and Run Model” button: Tap to execute the baseline model. First the whole body circulation is scaled according to the inputs. Then there is a tuning process, making adjustments to approximate the given MAP and SAP inputs. Then the model is run for a time equal to two complete respiration cycles, and results are displayed in the output screen. This sets up the baseline physiology of the patient. After the baseline run is complete the Next button is enabled, allowing the user to proceed to the Modify control screen.
Output Screen:
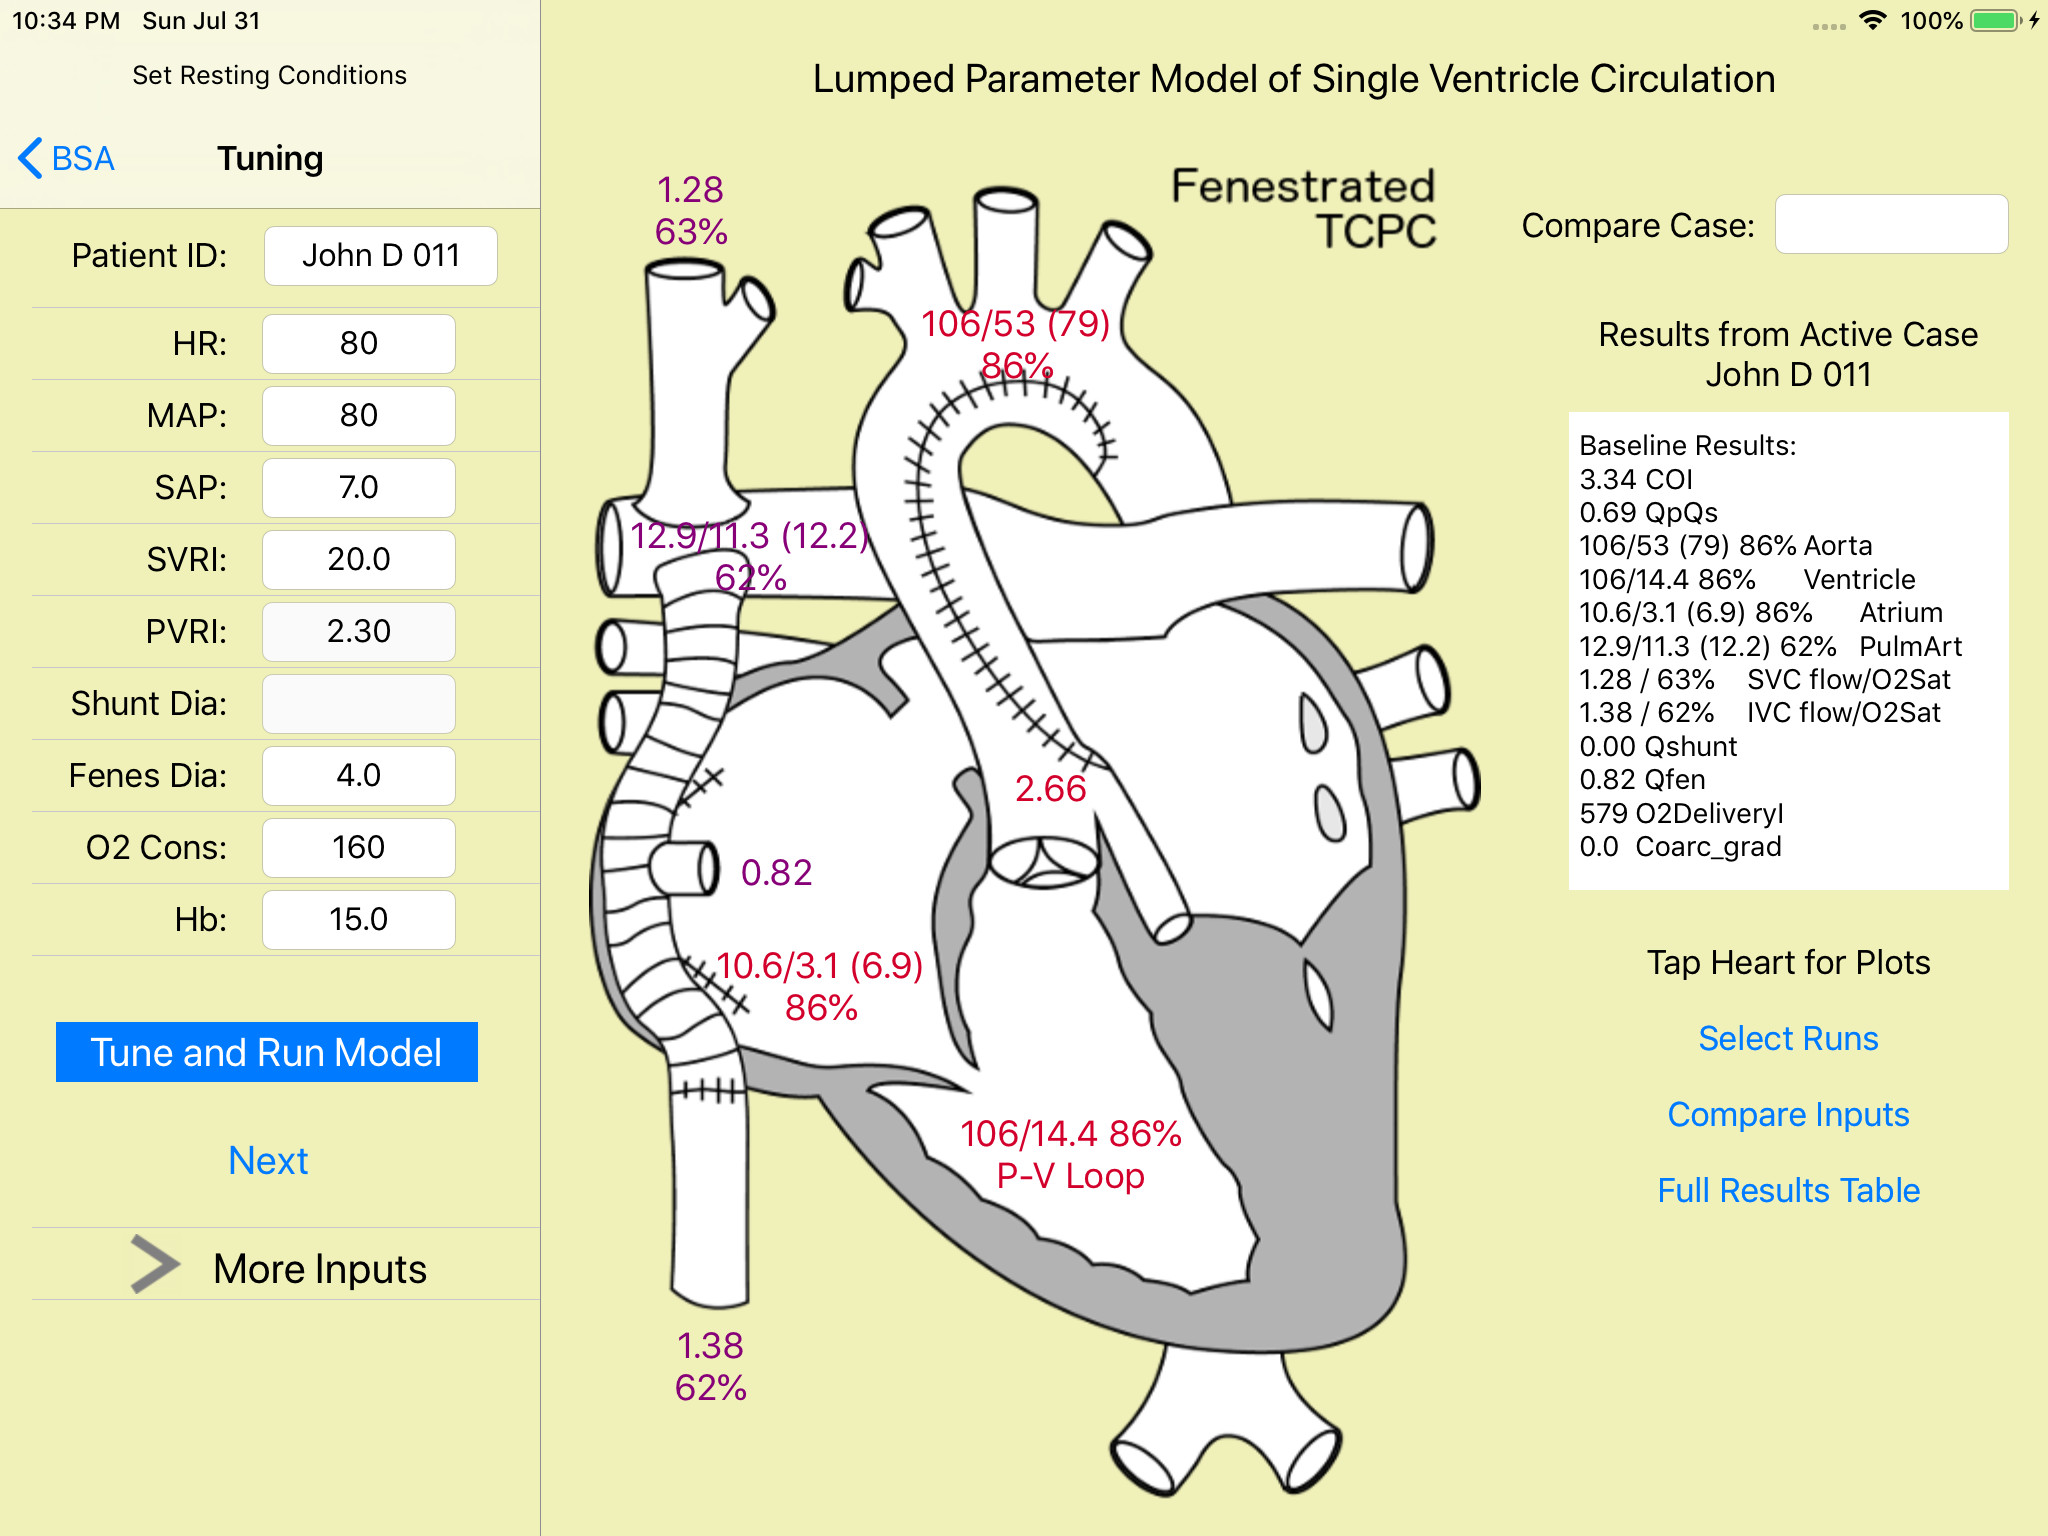
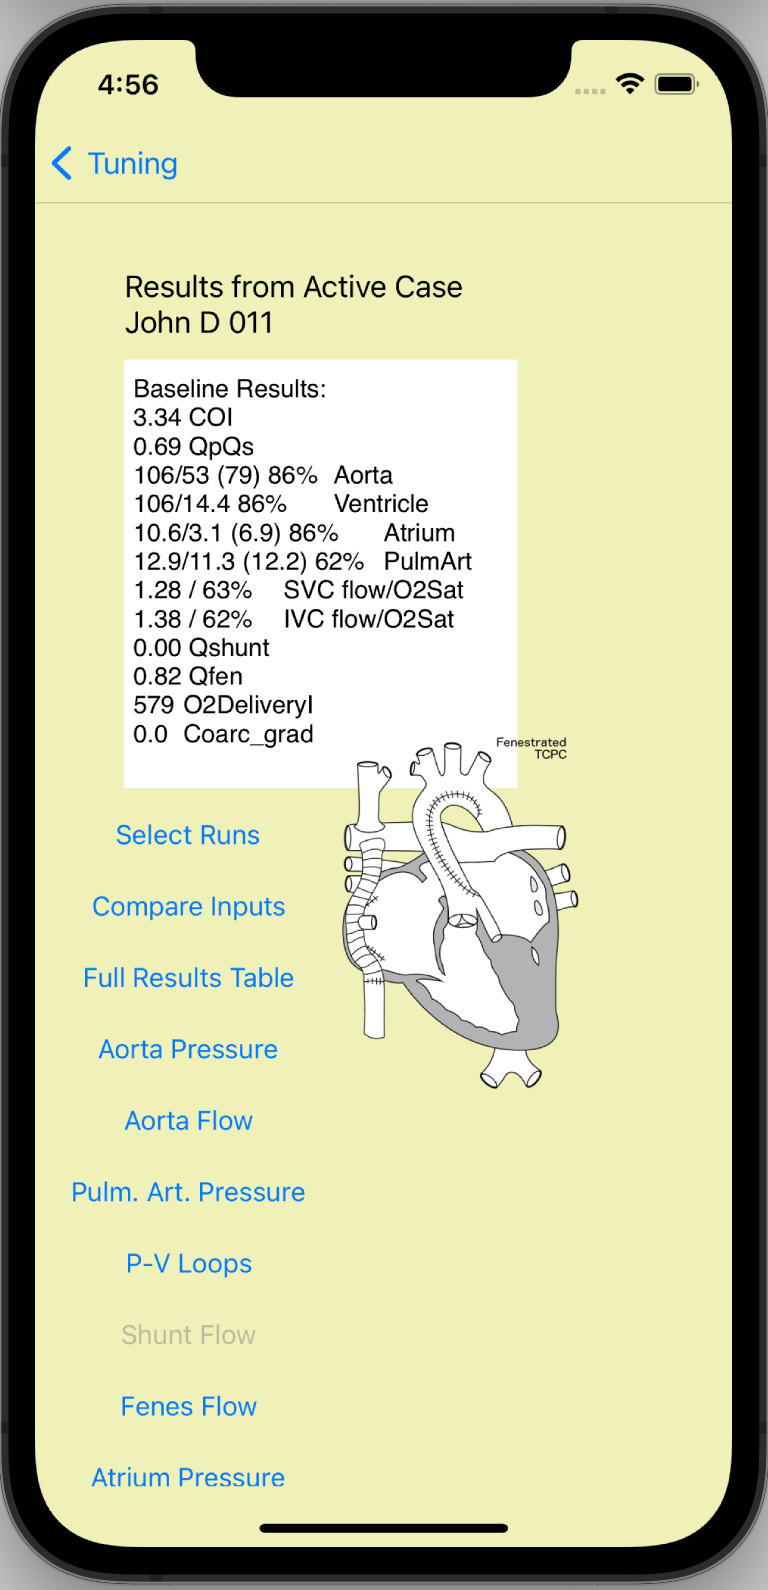
A summary of simulation results is printed in the text view on the right side of the output screen. Complete results are tabulated by tapping the “Full Results Table” button. Several of the major cardiological measurements of pressure and flow are also labeled over the large heart sketch, color-coded by blood Oxygen saturation. These labels are buttons; tapping each one brings up a plot of the corresponding pressure or flow trace for that location. In the iPhone version of the app there is no space for the large heart sketch. Instead, a column of buttons are provided to bring up the plots. The plots support the pinch-scaling mechanism to allow the user to adjust the view. They tend to look best holding the iPhone “landscape” style.
Modify Control Screen:

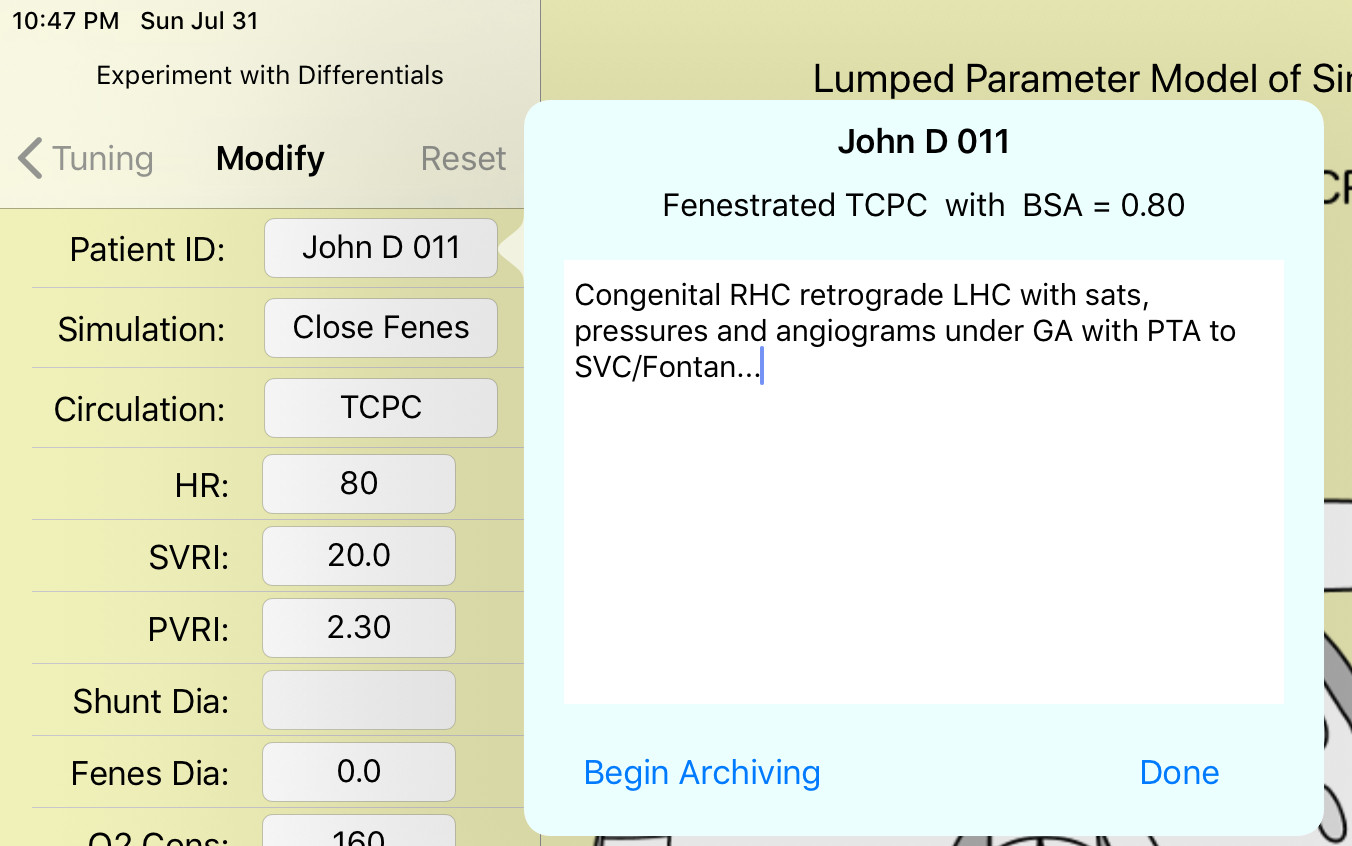
Patient ID: The patient identifier was set in the Tuning step. Here, tapping this field brings up the Patient Case popup, which has two functions. The user can enter notes for the patient file here, and also come back and edit them later. It is suggested to make notes about what is happening in the different modified runs. Be sure to tap the “Done” button to save the notes; simply dismissing the popup will discard your edits. Second, tap the “Begin Archiving” button to begin saving the patient case in the database within your device. From then on, the baseline run, all modified runs, and subsequent edits to the notes will all be saved automatically.
Simulation: Tapping this field brings up the Simulation popup. This is where the various simulation runs are organized. Use the picker wheel to select which simulation to display, and tap “Select.” If you select the Baseline run, the results will be displayed but the inputs will be locked, because the patient’s Baseline parameters are fixed. Tap the plus (+) button to create a new modified run. It will be given a default name such as “Modified2.” Tap the text field with the run name to rename it using the virtual keyboard, and tap “Select” to save the change. Any modified run can also be deleted by tapping the Trash button. A newly-created Modified run copies its inputs from the Baseline run, but they can be changed freely.

Circulation: Tapping this field brings up the Circulation popup. It has only one control, which is a picker wheel to change the circulation type of the Modified run. Usually this is used to predict effects of Stage 1 -> Glenn conversion or Glenn -> Fontan conversion. This primarily changes the surgical “plumbing” of the model, while leaving the tuned heart model and vascular bed parameters unchanged from the Baseline run. In conversion from Hybrid Stage 1 circulation to Glenn, the pulmonary artery bands(stenoses) are removed, reset to “patent.” In conversion from Glenn to TCPC a 4 mm fenestration is added by default.

HR: Heart Rate (beats/minute) enter the new value. Medications and changes of metabolism and sympathetic activity can all change the heart rate.
MAP and SAP are strictly outputs of Modified runs, not inputs. There are no inputs.
SVRI: Indexed Systemic Vascular Resistance (mmHg/(l/min)*m^2, also known as Woods Units*m^2).
PVRI: Indexed Pulmonary Vascular Resistance (mmHg/(l/min)*m^2, also known as Woods Units*m^2). These are the values for the vascular beds, excluding coarctation or pulmonary artery stenosis. They may change due to vasodilators, metabolic activity, etc. SVC and IVC stenosis are not supported.
Shunt Dia: Stage 1 shunt internal diameter (millimeters). For mB-T shunt, Sano shunt, or the stented Patent Ductus Arteriosis of the Hybrid Stage 1 surgery.
Fenes Dia: Stage 3 Fenestration diameter (millimeters). “None” and “closed” are also accepted inputs. Shunt diameter and fenestration diameter are used to estimate the flow resistance of these respective flow devices. If the actual flow is known from echo doppler for instance, the diameter input can be adjusted and the simulation re-run until the simulation result matches the known value.
O2 Cons: Indexed Oxygen Consumption (ml O2/min/m^2).
Hb: blood Hemoglobin concentration (g/dl).
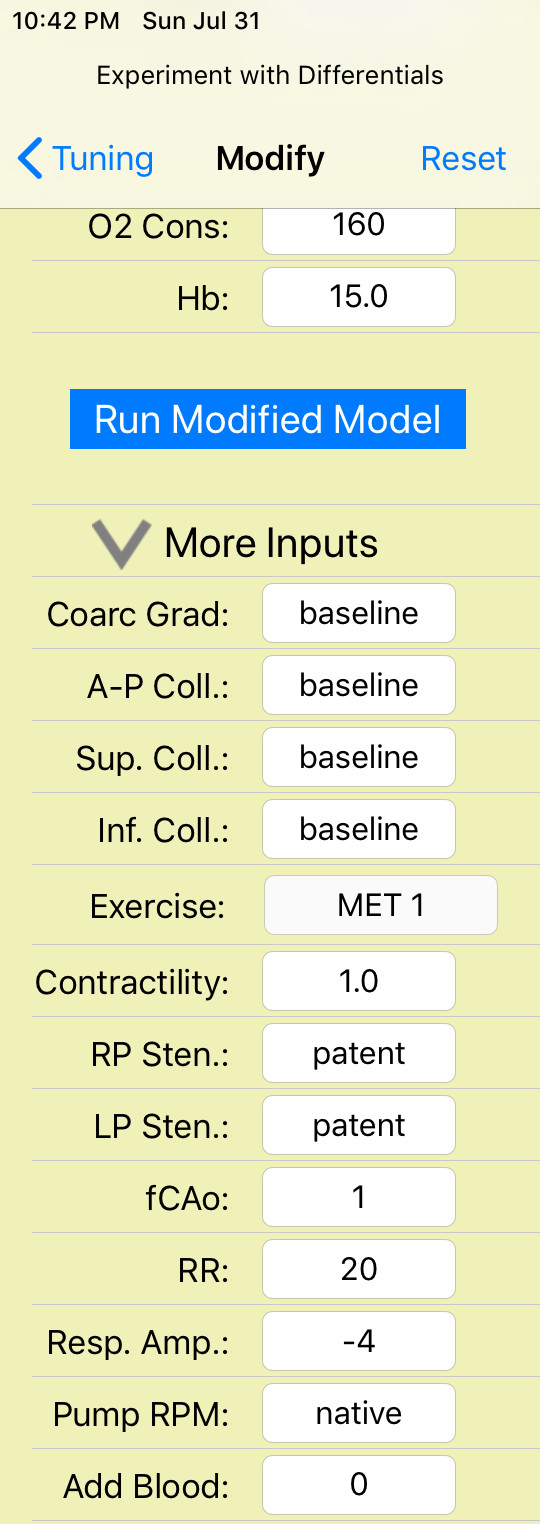
Tap the disclosure arrow to reveal thirteen more control inputs for Modified runs.
Coarc Grad: Mean pressure gradient across the Aortic coarctation (mmHg). “None” and “patent” and “baseline” are also accepted inputs. Mild = 10, moderate = 20, and severe = 30.
A-P Coll: Systemic arterial to pulmonary arterial collateral flow, scaled as a percentage of total pulmonary flow. Small = 10%, moderate = 30%, and large = 50%. “Baseline” is also accepted.
Sup. Coll: Superior vena cava to pulmonary vein collateral flow, scaled as a percentage of total pulmonary flow. Small = 10%, moderate = 20%, and large = 30%. “Baseline” is also accepted.
Inf. Coll: Inferior vena cava to pulmonary vein collateral flow, scaled as a percentage of total pulmonary flow. Small = 10%, moderate = 20%, and large = 30%. “Baseline” is also accepted.
The above four inputs are local resistance elements in the simulation. An input of “baseline” commands the simulation to use the resistance value that was established in the baseline run. In the modified run, the resulting value of coarctation gradient or collateral flow will be different from baseline according to other changing circumstances in the circulation.
Exercise: Tapping this field brings up the Exercise popup. It has only one control, which is a picker wheel to set the aerobic exercise level in terms of metabolic equivalent units (MET). Tap Select to make the change. The exercise model makes internal adjustments to the given values of HR, SVR, PVR, O2 Consumption, and Contractility, and it supersedes the given value of Respiration Amplitude. MET is a measure of aerobic exercise. For example at MET=3, your oxygen demand is three times your resting baseline rate.

Contractility: Ventricular Contractility factor (unitless). This is a resting value input, for change due to heart medication. The exercise model further-adjusts systolic function.
RP Sten: Right pulmonary artery stenosis internal diameter (mm), or lumen diameter set by banding in the case of Hybrid Stage 1 circulation. “None” and “patent” are also accepted inputs.
LP Sten: Left pulmonary artery stenosis internal diameter (mm), or lumen diameter set by banding in the case of Hybrid Stage 1 circulation. “None” and “patent” are also accepted inputs.
fCAo: Aortic arch compliance factor (unitless). Normal = 1.00. Reduced compliance increases pulse pressure and ventricular work.
RR: Respiration Rate (breaths/minute). Set this after setting HR. This input is used for resting state (MET 1), but the exercise model overrides it.
Resp. Amp.: Intrapleural Pressure Amplitude (mmHg). Normal = -4 for natural respiration. This input is used for resting state (MET 1), but the exercise model overrides it. Use positive values for forced ventilation.
Pump RPM: RPM for a TCPC impeller pump. Activating the pump automatically closes fenestration and veno-veno collaterals. A cartoon of the pump impeller appears within the TCPC junction in the main heart sketch to represent the pump. The significant pumping effect begins around 1000 RPM. The default input is “native,” indicating the conventional TCPC configuration with no pump.
Add Blood: Volume of blood added to circulation (ml), by hydration or volume-loading. Enter negative values for blood loss or dehydration.
“Run Modified Model” button: Tap to execute the active modified run. The model runs for about 30 seconds of simulation time to allow transients from the new inputs to settle. Then it continues to run for a time equal to two respiration cycles, and results are displayed in the output screen. In the iPhone version, if the Baseline run was selected then the button text reads “Display Baseline,” because the baseline run is never modified or re-run.

Output View Tools:
These are four tools on the Output screen to help organize and compare among different runs, and one optional Comparison Case the user can put side-by-side with the active Patient Case.
Compare Case: Tap this text field (iPad) or button (iPhone) to bring up the Select Compare popup. Use the picker wheel to choose one of the other Patient Cases in the archive, and tap the Select button to load it. You won’t be able to edit the Compare Case, but results will be displayed along with the active case. The first “case” listed in the picker wheel is “none.” Select this option to remove a previously-selected comparison case.

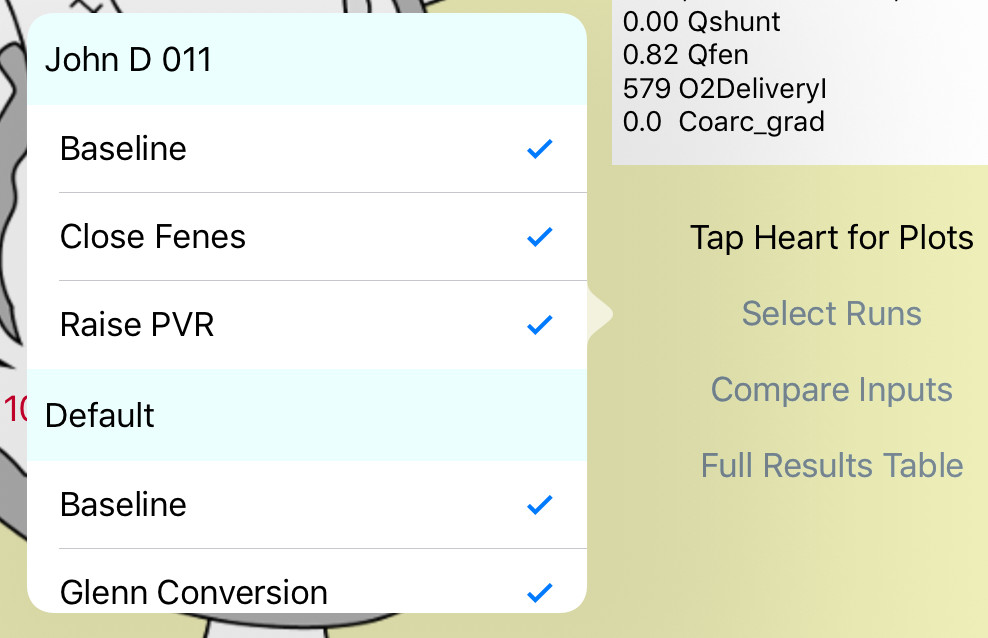
Select Runs: Tap this button to bring up the Select Runs popup. Here is a list of all the runs in the Active Case, followed by all the runs in the Compare Case. If there are too many runs and the results views are overwhelming, you can uncheck some of the runs to hide them.
Compare Inputs: Tapping the Compare Inputs button brings up a table of all the inputs in all the runs, to organize all that information. “Baseline” inputs in the modified runs are denoted “same” here. This is a scrolling view.

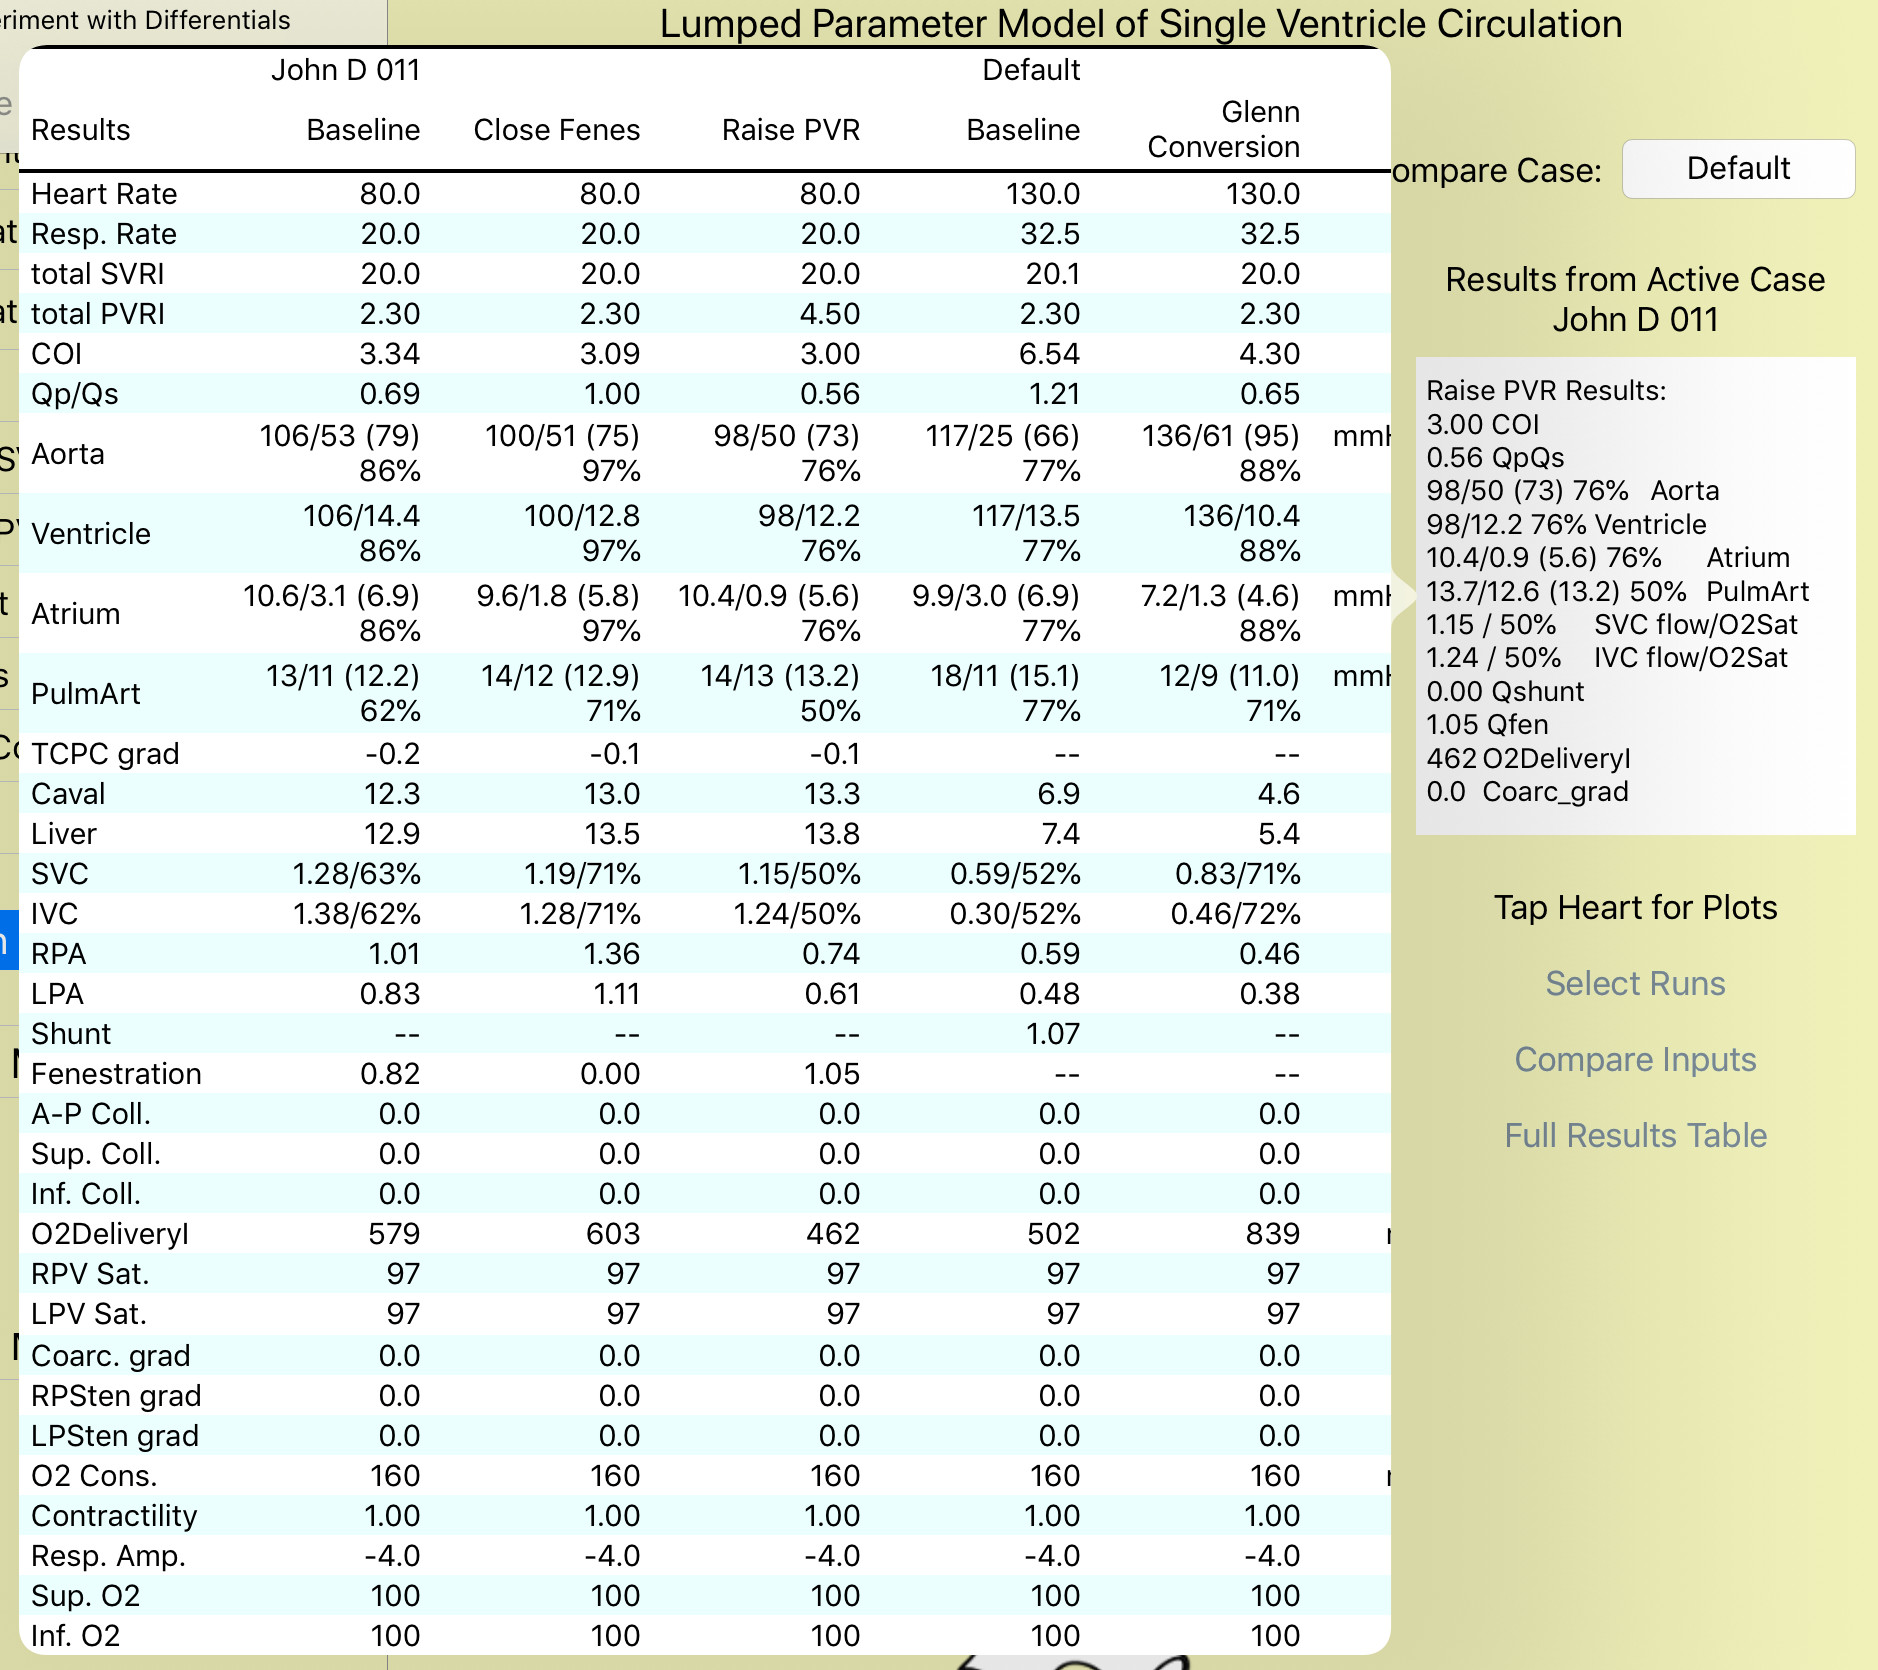
Full Results Table: Tapping this button brings up a table of all the results (not just the ones in the summary) in all the runs, to organize all that information. HR and RR change in the results according to the exercise model. This is a scrolling view.
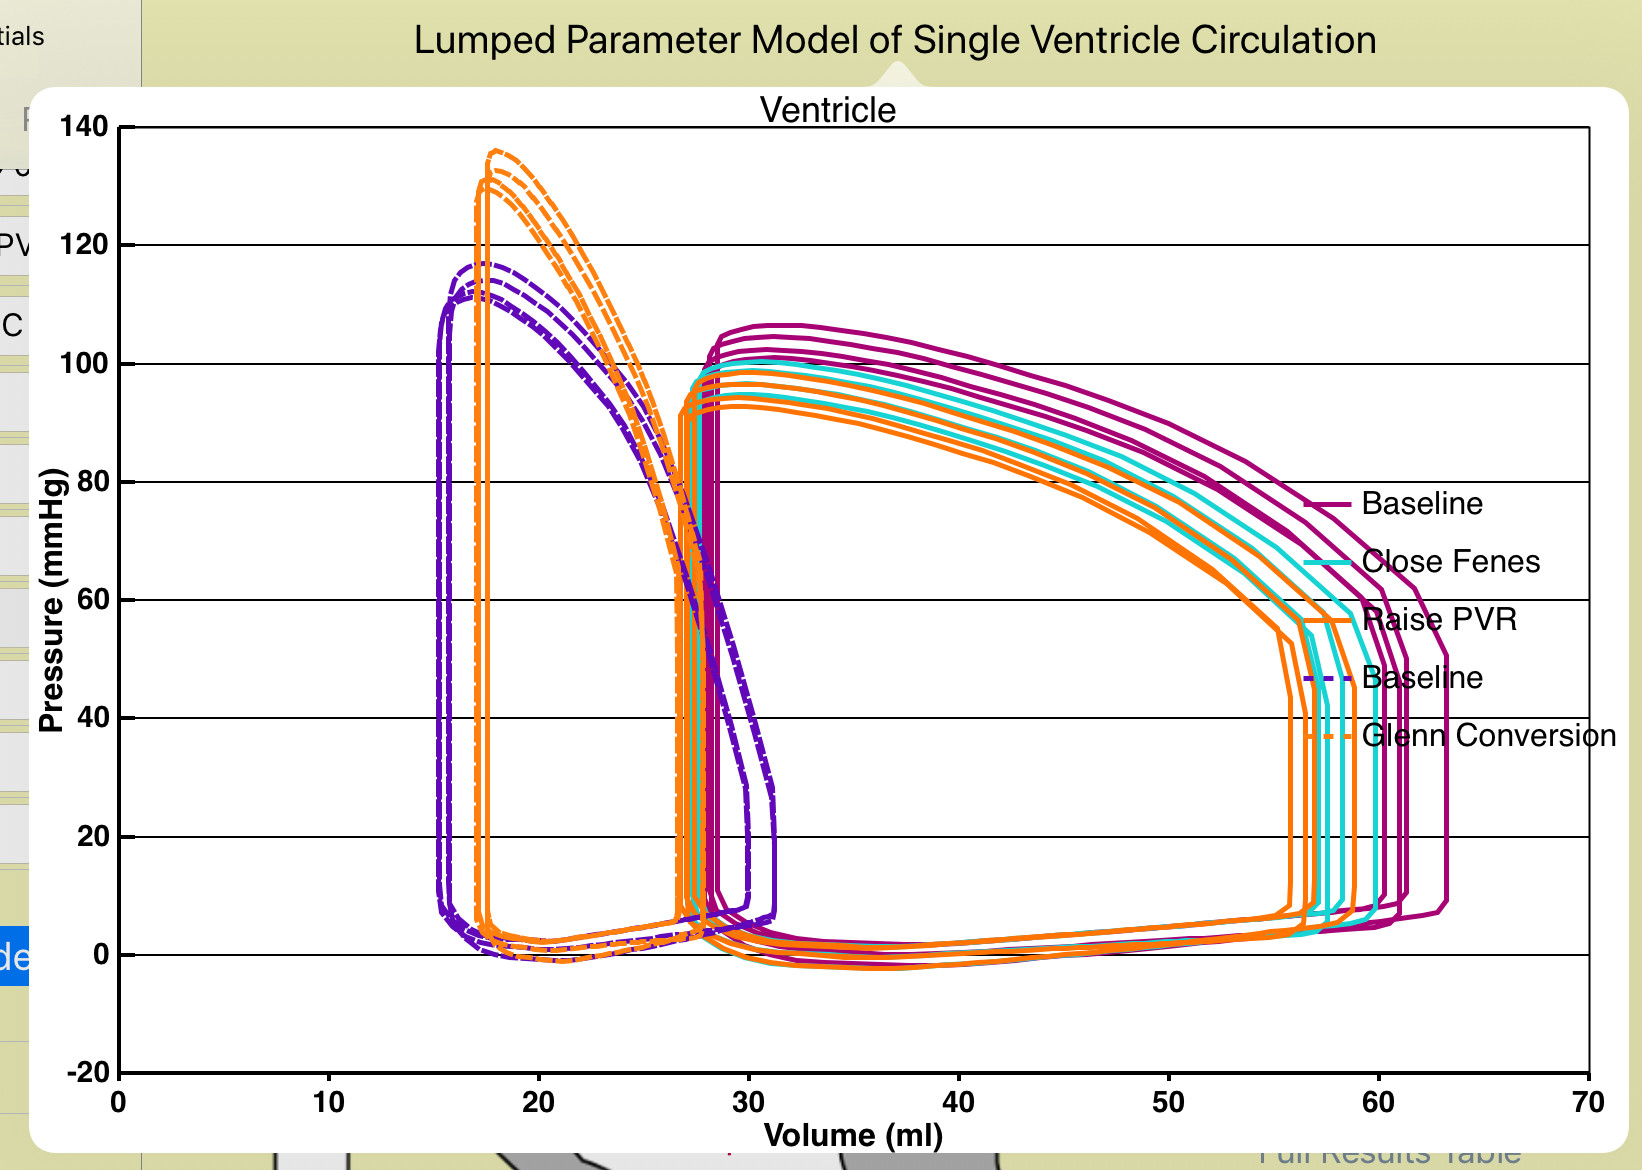
Simulation Plots: In the plots, the selected runs of the active Patient Case are shown in solid lines, followed by the selected runs of the Comparison Case shown in dashed lines. The example shows ventricular pressure-volume loops for a child-size Fontan patient, and a mB-T to Glenn conversion.
Archive Screen:
This screen is reached by tapping the “Archive” button on the Type control screen. Here all the Patient Cases stored in the database are listed by Patient ID in the picker wheel. Select a case and tap the Load button to retrieve the case and load it into the Modify control view. For each case, the summary (circulation type and BSA) is printed along with the first few lines of user notes, to help further identify the case. The selected case can also be deleted with the Delete button. This is permanent, irrecoverable. The Patient ID of the case can also be Renamed. This button brings up a small popup for renaming. Edit the ID with the virtual keyboard, and tap the Rename button in the popup to make the change. The notes can be edited in the Modify control screen after loading, and all the modified runs can be changed there.

Device Specific Features:
If the iPad is in Portrait orientation, the master view (control screens) gets hidden to the left any time you tap the output screen. Bring it back out by swiping to the right from the left edge. This makes sense once you try it.
In the iPhone version, the simulation plots support two-fingered pinch-scaling, to zoom and help make the plots most visible on the small screen. The plot format generally works best in Landscape orientation.
Also in the iPhone version, the two large tables (Compare Inputs and Full Results) have a second, “locked header” scrolling mode to help keep track of runs. This is controlled by a small, lock-shaped button on the top left of the table. In the normal mode, scrolling is controlled by dragging the body of the table in all directions, and the run titles easily disappear off the top of the screen. In locked header mode, the header stays visible at the top. Vertical scrolling of the table is still done by dragging the body of the table. BUT, horizontal scrolling now requires dragging the header right or left, instead, and the table body follows.
The Macintosh version is the same as the iPad version, except scrolling is done with the mouse or two fingers on the trackpad, Macintosh-style.

Results
(simulation results in the Results table)
Heart Rate: (beats/minute) Will be increased from input value during exercise.
Respiration Rate (breaths/minute) Will be increased from input value during exercise.
Total SVRI: (mmHg*min/l*m^2) Resistance of whole systemic circulation, including coarctation.
Total PVRI: (mmHg*min/l*m^2) Resistance of whole pulmonary circulation, including arterial stenoses.
COI: (l/min/m^2) BSA-Indexed cardiac output.
Qp/Qs: ratio of pulmonary blood flow to systemic blood flow.
Aorta: systolic/diastolic (mean) blood pressure in mmHg and O2 saturation in percent, at the aortic arch.
Ventricle: systolic/end diastolic blood pressure in mmHg and O2 saturation in percent.
Atrium: systolic/diastolic (mean) blood pressure in mmHg and O2 saturation in percent.
Pulmonary Artery: max/min (mean) blood pressure in mmHg and O2 saturation in percent.
TCPC Gradient: (mmHg) Average pressure gradient through the TCPC. Naturally negative; activating TCPC pump makes it positive.
Caval Pressure: (mmHg) Combined SVC and IVC pressure, or IVC pressure alone in Stage 2.
Liver Pressure: (mmHg) Indicator for splanchnic tract health.
SVC: flow (l/min) and O2 saturation in percent.
IVC: flow (l/min) and O2 saturation in percent.
RPA: flow (l/min).
LPA: flow (l/min).
Shunt: flow (l/min). For any of the three kinds of Stage 1 shunts.
Fenestration: flow (l/min).
Aorta-Pulmonary Artery Collateral: flow (l/min) Actual mean value from the simulation.
SVC-Pulmonary Venous Collateral: flow (l/min) Actual mean value from the simulation.
IVC-Pulmonary Venous Collateral: flow (l/min) Actual mean value from the simulation.
O2 Delivery Index: (ml O2/min/m^2) Total oxygen delivery to the body, combining systemic blood flow Qs, arterial saturation and O2 capacity from Hemoglobin, scaled by BSA.
RPV Saturation: (percent) Lung function is assumed to be good, so baseline pulmonary venous saturation is 97%. However both SVC and IVC veno-veno collaterals are assumed to drain into the RPV, thereby mixing deoxygenated blood and reducing saturation.
LPV Saturation: (percent) Lung function is assumed to be good, and LPV saturation is fixed at 97%.
Coarctation Gradient: (mmHg) Actual mean value from the simulation.
Right Pulmonary Stenosis Gradient: (mmHg) Mean value.
Left Pulmonary Stenosis Gradient: (mmHg) Mean value.
O2 Consumption: (ml O2/min/m^2) Amount of O2 taken from the blood, in the same units as O2 delivery. Also called extraction. This value is for the whole body.
Contractility: (ratio) Comparison of systolic contractility of the heart to the baseline value. Will be increased from input value during exercise.
Respiration Amplitude: (mmHg) Peak-Peak amplitude of intraplureal pressure. Typically negative. Will be increased (more negative) from input value during exercise.
Superior O2: (percent) Oxygen adequacy for upper body. Because the exercise model is for lower-body exercise, this is always 100%.
Inferior O2: (percent) Oxygen adequacy for lower body. Oxygen consumption (extraction) is limited by a minimum value of 20% venous saturation (in this case the femoral veins). In vigorous exercise oxygen demand may exceed the extraction limit, in which case this ratio, which is extraction/demand, will fall below 100%. The difference is the oxygen deficit, which can be sustained only briefly by anaerobic metabolism.
Design Inspiration:
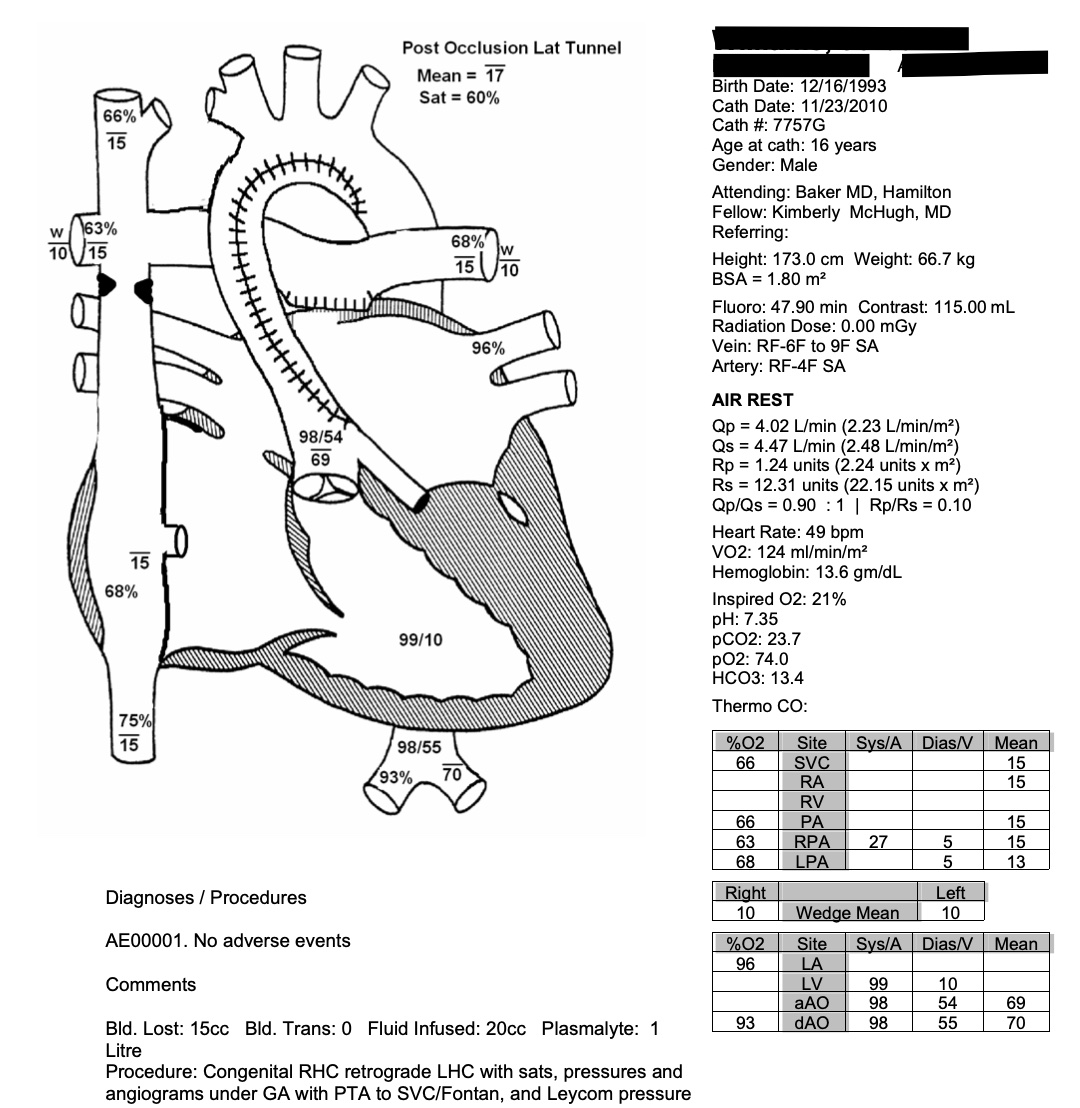
The output view was inspired by catheterization worksheets used at the Medical University of South Carolina.